AngularJS参考手册
教程 | Tutorial
显示英雄列表
本页中,你将扩展《英雄指南》应用,让它显示一个英雄列表, 并允许用户选择一个英雄,查看该英雄的详细信息。
创建模拟(mock)的英雄数据
你需要一些英雄数据以供显示。
最终,你会从远端的数据服务器获取它。 不过目前,你要先创建一些模拟的英雄数据,并假装它们是从服务器上取到的。
在 src/app/ 文件夹中创建一个名叫 mock-heroes.ts 的文件。 定义一个包含十个英雄的常量数组 HEROES,并导出它。 该文件是这样的。
src/app/mock-heroes.ts
content_copyimport { Hero } from './hero';

export const HEROES: Hero[] = [
  { id: 11, name: 'Mr. Nice' },
  { id: 12, name: 'Narco' },
  { id: 13, name: 'Bombasto' },
  { id: 14, name: 'Celeritas' },
  { id: 15, name: 'Magneta' },
  { id: 16, name: 'RubberMan' },
  { id: 17, name: 'Dynama' },
  { id: 18, name: 'Dr IQ' },
  { id: 19, name: 'Magma' },
  { id: 20, name: 'Tornado' }
];
显示这些英雄
你要在 HeroesComponent 的顶部显示这个英雄列表。
打开 HeroesComponent 类文件,并导入模拟的 HEROES。
src/app/heroes/heroes.component.ts (import HEROES)
content_copyimport { HEROES } from '../mock-heroes';往类中添加一个 heroes 属性,这样可以暴露出这些英雄,以供绑定。
content_copyheroes = HEROES;使用 *ngFor 列出这些英雄
打开 HeroesComponent 的模板文件,并做如下修改:
- 在顶部添加
<h2>, - 然后添加表示无序列表的 HTML 元素(
<ul>) - 在
<ul>中插入一个<li>元素,以显示单个hero的属性。 - 点缀上一些 CSS 类(稍后你还会添加更多 CSS 样式)。
做完之后应该是这样的:
heroes.component.html (heroes template)
content_copy<h2>My Heroes</h2>
<ul class="heroes">
  <li>
    <span class="badge">{{hero.id}}</span> {{hero.name}}
  </li>
</ul>
现在,把 <li> 修改成这样:
content_copy<li *ngFor="let hero of heroes">*ngFor 是一个 Angular 的复写器(repeater)指令。 它会为列表中的每项数据复写它的宿主元素。
在这个例子中
-
<li>就是*ngFor的宿主元素 -
heroes就是来自HeroesComponent类的列表。 - 当依次遍历这个列表时,
hero会为每个迭代保存当前的英雄对象。
不要忘了 ngFor 前面的星号(*),它是该语法中的关键部分。
浏览器刷新之后,英雄列表出现了。
给英雄们“美容”
英雄列表应该富有吸引力,并且当用户把鼠标移到某个英雄上和从列表中选中某个英雄时,应该给出视觉反馈。
在教程的第一章,你曾在 styles.css 中为整个应用设置了一些基础的样式。 但那个样式表并不包含英雄列表所需的样式。
固然,你可以把更多样式加入到 styles.css,并且放任它随着你添加更多组件而不断膨胀。
但还有更好的方式。你可以定义属于特定组件的私有样式,并且让组件所需的一切(代码、HTML 和 CSS)都放在一起。
这种方式让你在其它地方复用该组件更加容易,并且即使全局样式和这里不一样,组件也仍然具有期望的外观。
你可以用多种方式定义私有样式,或者内联在 @Component.styles 数组中,或者在 @Component.styleUrls 所指出的样式表文件中。
当 CLI 生成 HeroesComponent 时,它也同时为 HeroesComponent 创建了空白的 heroes.component.css 样式表文件,并且让 @Component.styleUrls 指向它,就像这样:
src/app/heroes/heroes.component.ts (@Component)
content_copy@Component({
  selector: 'app-heroes',
  templateUrl: './heroes.component.html',
  styleUrls: ['./heroes.component.css']
})
打开 heroes.component.css 文件,并且把 HeroesComponent 的私有 CSS 样式粘贴进去。 你可以在本指南底部的查看最终代码中找到它们。
@Component 元数据中指定的样式和样式表都是局限于该组件的。 heroes.component.css 中的样式只会作用于 HeroesComponent,既不会影响到组件外的 HTML,也不会影响到其它组件中的 HTML。
主从结构
当用户在主列表中点击一个英雄时,该组件应该在页面底部显示所选英雄的详情。
在本节,你将监听英雄条目的点击事件,并更新英雄的详情。
添加 click 事件绑定
再往 <li> 元素上插入一句点击事件的绑定代码:
heroes.component.html (template excerpt)
content_copy<li *ngFor="let hero of heroes" (click)="onSelect(hero)">这是 Angular 事件绑定 语法的例子。
click 外面的圆括号会让 Angular 监听这个 <li> 元素的 click 事件。 当用户点击 <li> 时,Angular 就会执行表达式 onSelect(hero)。
onSelect() 是 HeroesComponent 上的一个方法,你很快就要写它。 Angular 会把所点击的 <li> 上的 hero 对象传给它,这个 hero 也就是前面在 *ngFor表达式中定义的那个。
添加 click 事件处理器
把该组件的 hero 属性改名为 selectedHero,但不要为它赋值。 因为应用刚刚启动时并没有所选英雄。
添加如下 onSelect() 方法,它会把模板中被点击的英雄赋值给组件的 selectedHero 属性。
src/app/heroes/heroes.component.ts (onSelect)
content_copyselectedHero: Hero;

onSelect(hero: Hero): void {
  this.selectedHero = hero;
}
修改详情模板
该模板引用的仍然是老的 hero 属性,但它已经不存在了。 把 hero 改名为 selectedHero。
heroes.component.html (selected hero details)
content_copy<h2>{{selectedHero.name | uppercase}} Details</h2>
<div><span>id: </span>{{selectedHero.id}}</div>
<div>
  <label>name:
    <input [(ngModel)]="selectedHero.name" placeholder="name">
  </label>
</div>
使用 *ngIf 隐藏空白的详情
刷新浏览器,应用挂了。
打开浏览器的开发者工具,它的控制台中显示出如下错误信息:
content_copyHeroesComponent.html:3 ERROR TypeError: Cannot read property 'name' of undefined现在,从列表中随便点击一个条目。 应用又正常了。 英雄们显示在列表中,并且所点英雄的详情也显示在了页面的下方。
怎么回事?
当应用启动时,selectedHero 是 undefined,设计如此。
但模板中的绑定表达式引用了 selectedHero 的属性(表达式为 {{selectedHero.name}}),这必然会失败,因为你还没选过英雄呢。
修复
该组件应该只有当 selectedHero 存在时才显示所选英雄的详情。
把显示英雄详情的 HTML 包裹在一个 <div> 中。 并且为这个 div 添加 Angular 的 *ngIf 指令,把它的值设置为 selectedHero。
不要忘了 ngIf 前面的星号(*),它是该语法中的关键部分。
src/app/heroes/heroes.component.html (*ngIf)
content_copy<div *ngIf="selectedHero">

  <h2>{{selectedHero.name | uppercase}} Details</h2>
  <div><span>id: </span>{{selectedHero.id}}</div>
  <div>
    <label>name:
      <input [(ngModel)]="selectedHero.name" placeholder="name">
    </label>
  </div>

</div>
浏览器刷新之后,英雄名字的列表又出现了。 详情部分仍然是空。 点击一个英雄,它的详情就出现了。
为什么改好了?
当 selectedHero 为 undefined 时,ngIf 从 DOM 中移除了英雄详情。因此也就不用担心 selectedHero 的绑定了。
当用户选择一个英雄时,selectedHero 也就有了值,并且 ngIf 把英雄的详情放回到 DOM 中。
给所选英雄添加样式
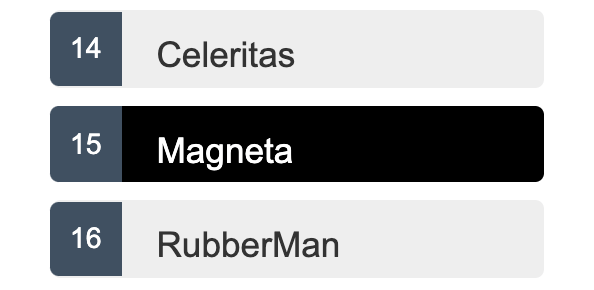
所有的 <li> 元素看起来都是一样的,因此很难从列表中识别出所选英雄。
如果用户点击了“Magneta”,这个英雄应该用一个略有不同的背景色显示出来,就像这样:

所选英雄的颜色来自于你前面添加的样式中的 CSS 类 .selected。 所以你只要在用户点击一个 <li> 时把 .selected 类应用到该元素上就可以了。
Angular 的 CSS 类绑定机制让根据条件添加或移除一个 CSS 类变得很容易。 只要把 [class.some-css-class]="some-condition" 添加到你要施加样式的元素上就可以了。
在 HeroesComponent 模板中的 <li> 元素上添加 [class.selected] 绑定,代码如下:
heroes.component.html (toggle the 'selected' CSS class)
content_copy[class.selected]="hero === selectedHero"如果当前行的英雄和 selectedHero 相同,Angular 就会添加 CSS 类 selected,否则就会移除它。
最终的 <li> 是这样的:
heroes.component.html (list item hero)
content_copy<li *ngFor="let hero of heroes"
  [class.selected]="hero === selectedHero"
  (click)="onSelect(hero)">
  <span class="badge">{{hero.id}}</span> {{hero.name}}
</li>
查看最终代码
你的应用现在变成了这样:在线例子 / 下载范例。
下面是本页面中所提及的代码文件,包括 HeroesComponent 的样式。
src/app/heroes/heroes.component.ts
src/app/heroes/heroes.component.html
src/app/heroes/heroes.component.css
content_copyimport { Component, OnInit } from '@angular/core';import { Hero } from '../hero';import { HEROES } from '../mock-heroes'; @Component({ selector: 'app-heroes', templateUrl: './heroes.component.html', styleUrls: ['./heroes.component.css']})export class HeroesComponent implements OnInit { heroes = HEROES; selectedHero: Hero; constructor() { } ngOnInit() { } onSelect(hero: Hero): void { this.selectedHero = hero; }}小结
- 英雄指南应用在一个主从视图中显示了英雄列表。
- 用户可以选择一个英雄,并查看该英雄的详情。
- 你使用
*ngFor显示了一个列表。 - 你使用
*ngIf来根据条件包含或排除了一段 HTML。 - 你可以用
class绑定来切换 CSS 的样式类。

 加载中,请稍侯......